Search This Blog

Connecting from Weblogic server to JBoss server using Bridges - JMS Bridge Destinations

Connecting from Weblogic server to JBoss server using Bridges - JMS Bridge Destinations

List of required Jar Files Please in place server lib Folder

Base_Domain/lib


Click JMS Bridge Destinations


Create New and provide below information (Target System Jboss information)


Name:  ATGJbossJMSDestination
Adapter JNDI Name: eis.jms.WLSConnectionFactoryJNDIXA
Connection URL:   jnp://xyz:1099
Connection Factory JNDI Name: /ConnectionFactory
Destination JNDI Name:  queue/OrderCreateTest ( Only for Testing Purpose )
Initial Connection Factor: org.jnp.interfaces.NamingContextFactory (This Property is very important)


Click Ok.  ATGJbossJMSDestination created.

Source JMS Bridge Creation: (Weblogic Source System)


Name:  ATGInputSrc
Adapter JNDI Name: eis.jms.WLSConnectionFactoryJNDIXA
Connection URL:  t3://localhost:7001
Connection Factory JNDI Name:  jms.ATGInput_CF
Destination JNDI Name:  jms.ATGInput_Queue


Click ok.


ATGInputSrc created as shown above.

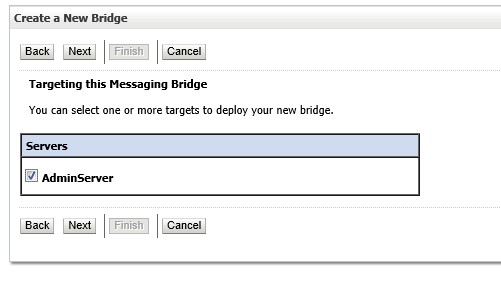
Create a New Bridge:


Select Source Destination   (Weblogic)


Select Message Provider  à weblogic Server 7.0 or higher


Select Target Bridge Destination: (JBoss)


Select Message Provider  à Other JMS


Select Server Name: (Please chose always SOA_Server) in this example shown AdminServer


Bridge Creation Done :


Restart weblogic Server (Note: whenever changes made in source or target Bridge. Restart Server)
If you facing State as Inactive please check Target System (Jboss)


Correct Setting  TO Push Message
State: Active

Description : Forwarding Message  

Enabling JMS Server logs in Weblogic Server

Enabling JMS Server logs in Weblogic Server


Default the JMS Server log available in below location


     Enabling  log message in Topic level. If "All Body" option choose then complete message will be logged in JMS server logs.


JMS Server Log file location


Sample JMS Server logs will body content

oracle/pii_security_policy - OWSM Policy

oracle/pii_security_policy - OWSM Policy


Use of this policy to  encrypt user data in server log files ( Example SSN number or Credit Card Number ). So additional  data level security 


          Project structure :


           Composite Structure  :


         Adding Policies in proxy service - PII


Edit PII  property and add Xpath expression to the filed you want to encrypt 


             Output message Optional 


CSF Key is required to encrypt the user data. Configure in Key store ( EM Console)


Pipeline structure  


                          Body replaced to view in  console output


  EM Console adding security --> Credentials 


Create map as "oracle.wsm.security" and create key as "pii-csf-key" 


  Provide username and password 


Console Input and Output data 

( Input "Krishna Moorthi" and in Output encrypted as below )


oracle/log_policy - Management - OWSM policy

oracle/log_policy - Management - OWSM policy


Main purpose of the policy to view Incoming and Outgoing  SOAP envelope of Proxy or Business service including soap header and body 


Input and Output message 


   log_policy available in "owsm"  folder path


  This log file contain only incoming and outgoing message ( No other message will be printed )


Secure JMS module with authentication ( Username and password )

Secure JMS module with authentication ( Username and password )


In real world providing security  is important for JMS module . So the user have permission only able to Consume or produce message to Topic/ Queue 


My JMS Module Name :  WVOResHubModule I want to implement security for Topic . As of now Group policy to everyone can access Topic message. In order to provide access for certain users add security  shown below


JMS Module --> Security -->Policies  


Click Add Conditions --> Predicate List --> User


Add usernames  : I added "weblogic"  as username


 Click add button


Now weblogic added in JMS module level . so all the Queues and topics below to this JMS module secured with username and password auth


Now the policy used by changed from "everyone" to "weblogic". So weblogic user have only permission to read and write message to Topic/ Queue 


Adding Header in Service and Reference in BPEL 2.0 and BPEL 1.1 SOA - SOAP


simple test case with soapUI which adds an username and a message as HTTP header to the  service invocation.  In a second testcase I will mock this service in soapUI and BPEL will invoke this service and set an extra HTTP header property.


SOAP - BPEL


First step is to add a property to the binding.ws element of the service in the composite.xml. Add a property with name oracle.webservices.http.headers and as value the HTTP headers you want to use in BPEL
<property name="oracle.webservices.http.headers">username,message</property>


Next step is to define some BPEL variables for those HTTP Headers


In the receive activity of the BPEL process we can use fromProperty to copy the HTTP header property value to the BPEL variable. 

Do this in the BPEL source mode. 

BPEL 2.0


BPEL 1.1

  <receive>
  <bpelx:outputProperty name="username"    variable="usernameVar"/>
  <bpelx:inputProperty name="message"    variable="messageVar"/>
  </receive>


Now you can use these variables in BPEL, I will use these vars in the return message.

Let's invoke the service from soapUI, we need to set the HTTP header properties with their values.


When we want to invoke a reference service and we also want to set some HTTP header properties.

We need also need to set the http.headers property on the binding.ws element on the reference in the composite.xml

<property name="oracle.webservices.http.headers">username,message,message2</property>


On the invoke of the reference service we need to use the toProperty and set the BPEL vars to these HTTP header properties.

BPEL 2.0


BPEL 1.1 

  <invoke>
    <bpelx:inputProperty name="username"    variable="usernameVar"/>
  <bpelx:inputProperty name="message"    variable="messageVar"/>
  <bpelx:inputProperty name="message2"    variable="messageVar2"/>
</invoke>

When we test it again in soapUI we can see the invoke request of the soapUI mockservice,
 this contains the HTTP headers which we set in the BPEL process.